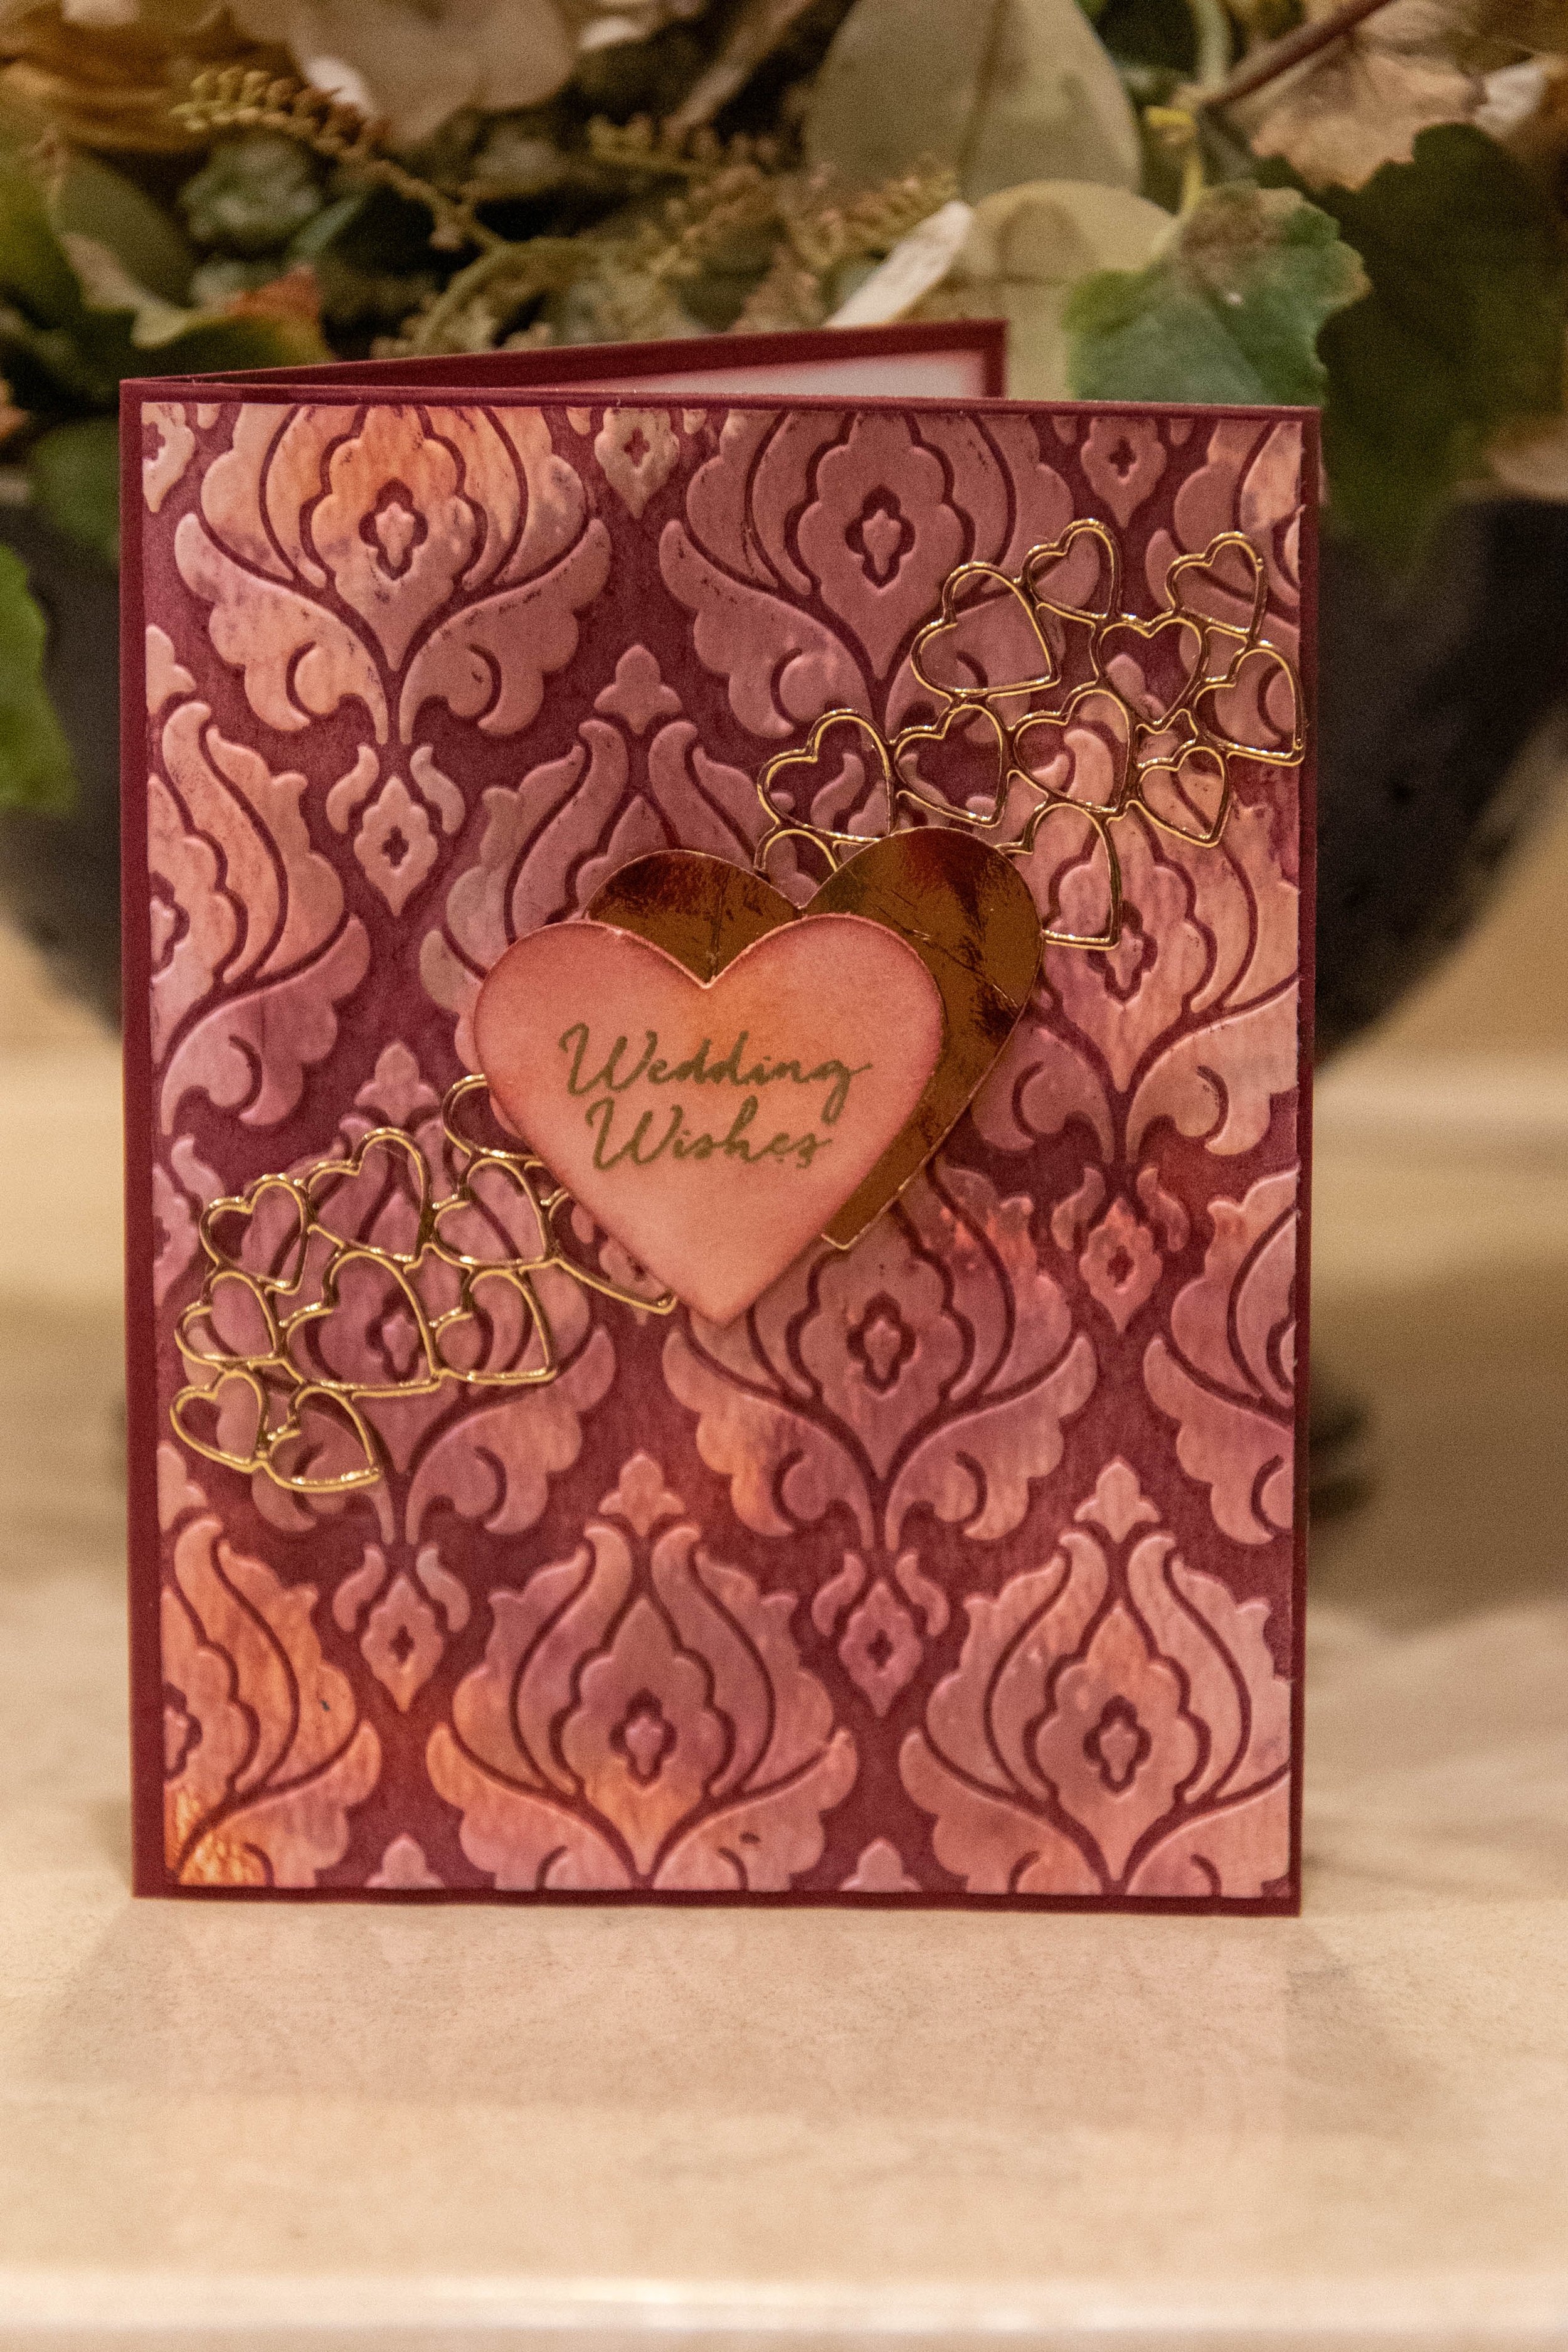
Wedding Wishes
This card was a special order for a friend who niece was married in Pakistan. I wanted the card to reflect the spirit of the wedding which is different than the wedding cards I usually make. This is another card that uses the techniques demonstrated in Jennifer McGuire’s (09.02.25) technique video, which I linked below.
This card is a 5.5” by 4.25” card (A2). The products used on this card are listed at the end of the page.
I apologize as I didn’t take a lot of pictures.
Step by Step Instructions for making this Card.
Make the Card Base
1. Make the card base with the Cherry Cobbler Card Stock for A2 card. (See Card Basics).
Cut the Card Panels
There are seven panels that need to be cut for this card.
2. 5 ½” x 4 1/4” watercolor paper for embossed front panel.
3. 3” x 3” square Hammermill Premium color copy cover - white paper for the front heart.
4. 3” x 3” square of gold cardstock for the gold heart.
5. 4” x 2” rectangle of gold cardstock for the flying hearts.
6. 4” X 2” rectangle from adhesive paper
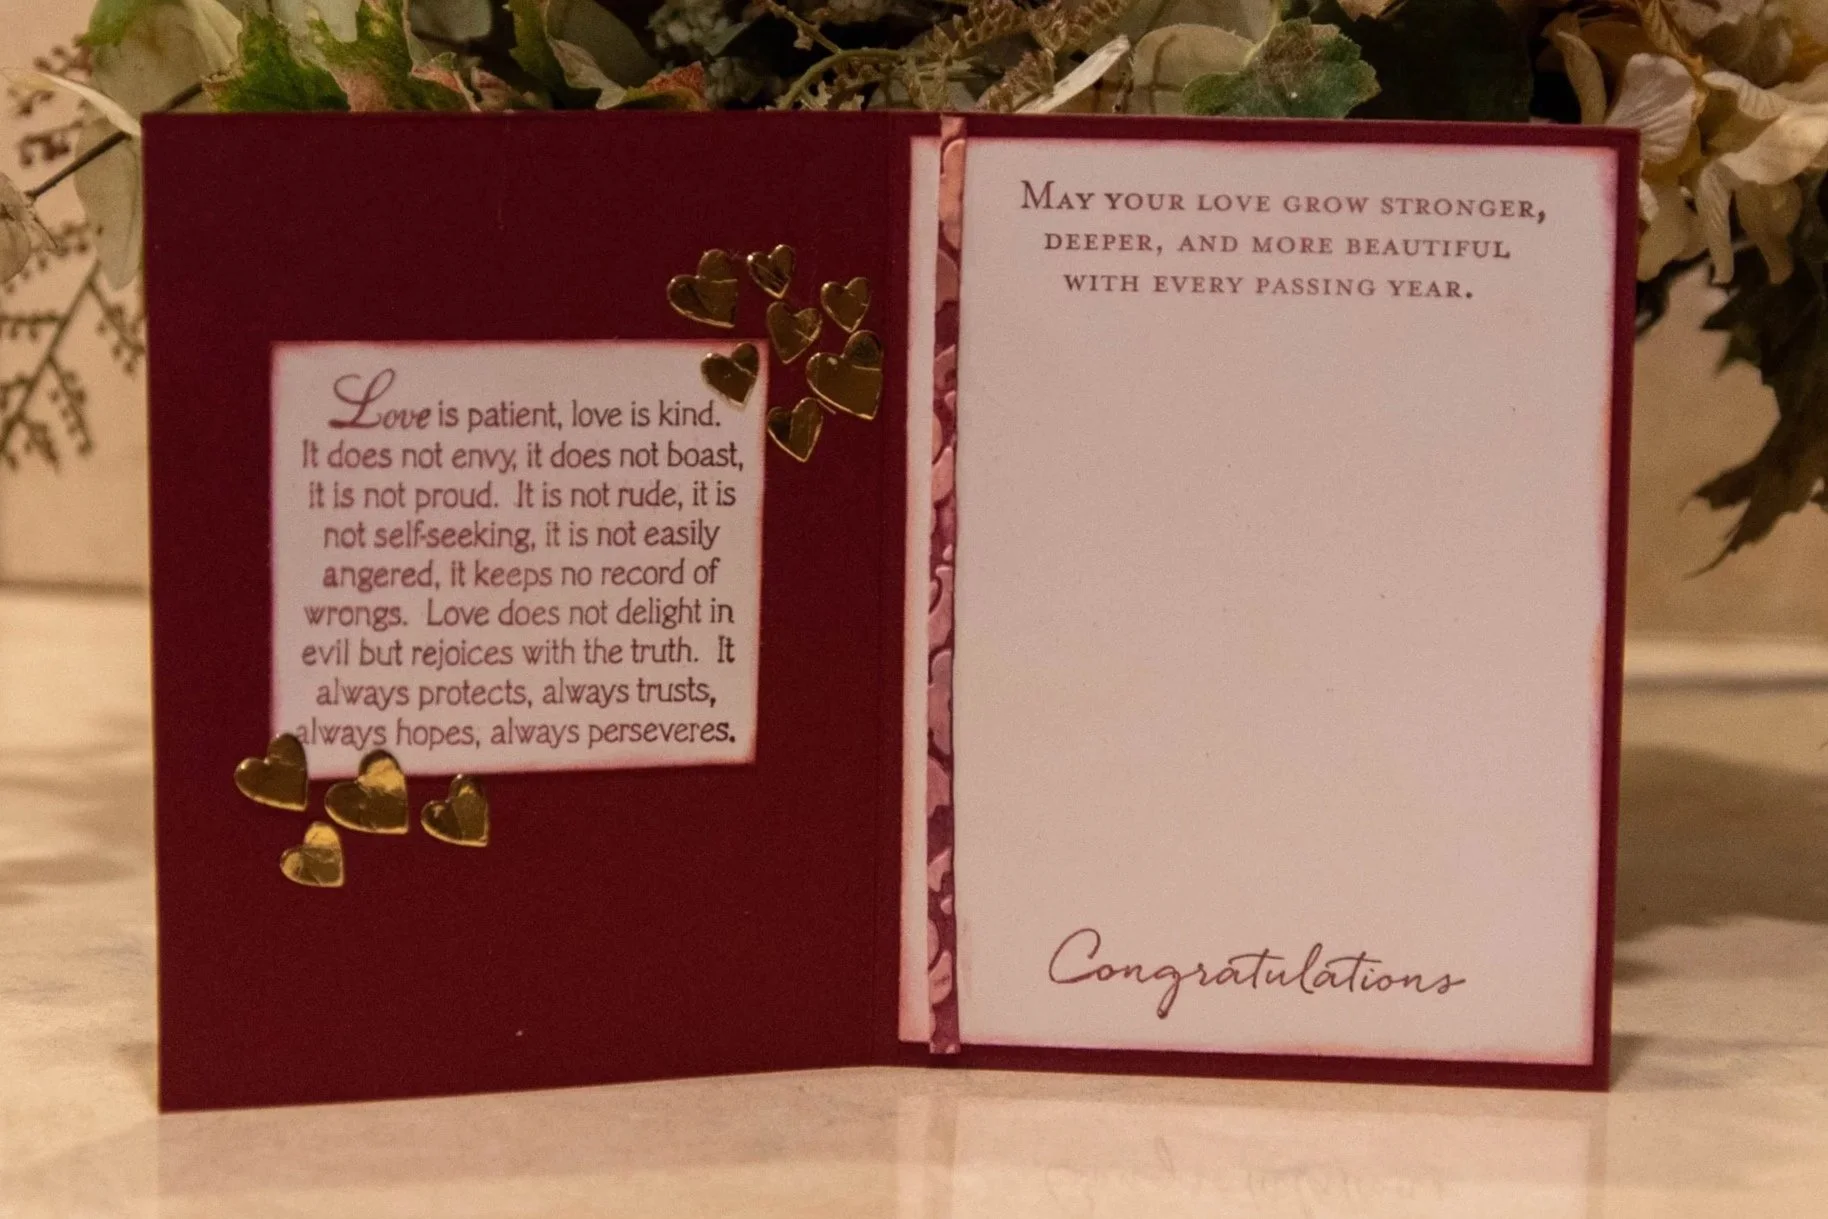
7. 4 1/8” x 5 3/8” rectangle Hammermill Premium Color Copy Cover -white paper for interior sentiment
8. Rectangle that fits around the Love is patient stamp sentiment.
Make the embossed watercolor background
9. On the watercolor panel take the following inks, Cherry Cobbler, Tangerine Tango, and Moody Mauve, and smear them randomly across the paper.
10. Take a water bottle and mist the watercolor panel you just applied the ink to activate the inks. Use your own judgement on how much water to use but be careful about using too much as the inks may muddle. I misted the paper.
11. Let the panel dry.
12. Once dried apply the cherry cobbler ink on the side of the embossing folder where the baroque pattern would be indented on the folder (resulting in the baroque pattern elevated on the finished product).
13. Put the dried watercolor panel onto the embossing folder. Inked side on top of the inked embossing folder.
14. Run the panel through the die/embossing machine.
15. Trim the panel down to 4” 1/8 X 5 3/8” rectangle. Save the trimmed pieced for assembly.
Color, Cut and Emboss the Front Hearts.
16. On the 3” x 3” white square brush the embossing powder from the Rabbit Hole Design. This reduces the static electricity.
17. On the center of this panel ink the “wedding wishes” stamp with versamark ink.
18. Sprinkle the princess gold onto the panel and gently tap off the excess so the sentiment is covered with the gold embossing powder.
19. Heat set the sentiment.
20. Use a blending brush to blend the Cherry Cobbler, Tangelo Tango, and Moody Mauve inks over the panel. Use a micro cloth to wipe the ink off the embossed sentiment.
21. Position the heart die so the sentiment is centered. Use the die cut machine to cut out the heart. Use a dauber to burnish the cherry cobbler on the edge of the heart.
22. Use the same heart die to cut out a heart from the 3” x 3” gold cardstock.
Cut out Flying hearts.
23. Remove the tacking from one side of the adhesive sheet. Apply the adhesive paper to the back of the 4” x 2” gold cardstock
24. Cut out the flying heart from the gold cardstock panel using the flying hearts framelit.
25. Keep all pieces (outline and hearts)
Note the image will be shorter than it appears in the picture.
Assemble card
29. Glue interior panel onto the inside of the card. Glue the saved trim from the front panel onto sentiment panel on the inside of the card.
30. Glue the “Love is Patient...” panel on the left inside panel of the card.
31. Take the flying heart outline and cut in half. Use the outline to position the gold hearts over the “love is Patient...” sentiment. Pull the adhesive off the gold hearts and apply the gold heart “stickers” onto the desired position.
32. Glue the embossed baroque panel onto the front of the card.
33. Remove the backing on the flying hearts outline pieces (at this point you have two halves). Position and adhere the “sticker” of the flying hearts outline so it appears to start on the left and fly off to the right. You will have a gap in the middle.
34. Glue the “wedding wishes” heart onto the gold heart with an offset. Glue these hearts over the gap so it appears that the flying hearts are contiguous.
Stamp the Interior Panels
26. Stamp the “Love is Patient” stamp with Cherry Cobbler.
27. Trim the “Love is Patient” sentiment to fit around the stamped image and burnish with Cherry Cobbler.
28. On the interior panel, using a stamp positioner, position the “May you love grow” stamp at the top of the panel and the “congratulation” stamp at the bottom of the panel. Ink with Cherry Cobbler ink and stamp onto the panel.
List of products and tools
Non-Consumables
“Beautifully Baroque” embossing folder by Stampin’ Up
“Love is Patient, love is kind. …. always perseveres.” stamp by unknown.
“Floral Phrases” Stamp set by Stampin’ Up; “Wedding Wishes”, “May your love grow stronger, deeper, and more beautiful with every passing year”, and “Congratulations”
“Hearts Collection” Framelits by Stampin’ Up.
“Be Mined Stitched” Framelits by Stampin’ Up; the Flying Hearts
Consumable
“Cherry Cobbler” Classic Ink by Stampin’ up
“Tangerine Tango” Classic Ink by Stampin’ Up
“Moody Mauve” Classic Ink by Stampin’ Up
“Versamark” Watermark ink by Tsukineko
Cherry Cobbler” Cardstock by Stampin’ Up
“Gold Cardstock” Cardstock by Micheal’s
Watercolor Paper
“Cottontail Embossing Powder by The Rabbit Hole designs
“White” Premium Color Copy Cover Paper by Hammermill
Princess Gold Embossing Powder from Ranger
Precision Craft Glue from Bearly-Art
Adhesive sheet for the flying heart outline.
Special Tools
Platinum Machine by Spellbinders
BetterPress System by Spellbinders
Embossing Powder Brush Tool by The Rabbit Hole Design
Glue Dispenser by Sweet Petunia
MISTI stamp positioner by Sweet Petunia